Photography Tips: How to Get the Classic Pisa Shot
For the classic forced-perspective Tower shot, stand on the east side of the lawn approximately 15–20 metres from the Tower and have the photographer position themselves low (crouching or kneeling) at a distance of 30–40 metres. The camera angle is everything — it takes a few trial shots to line up. For the best light and fewest photobombers, arrive at or just after opening time (9:00 AM) or in the late afternoon/evening.
Few travel photographs are as universally attempted — or as genuinely tricky to get right — as the Leaning Tower of Pisa forced-perspective shot. Millions of visitors each year try to capture themselves appearing to hold up, push over, or interact with the Tower. This guide explains exactly how the technique works, where to stand, what time to visit for the best light, and what else to photograph beyond the classic pose.
Best Time for Photography
Early morning (9:00–10:30 AM) gives direct east-facing light on the Tower with minimal crowds. Late afternoon (after 17:00) gives warm golden-hour light across the square. Overcast days provide ideal even light for the white marble. Avoid harsh midday sun in summer.
Early morning (9:00–10:30 AM) The best single piece of photographic advice for Piazza dei Miracoli is to arrive at or just after opening time. In the first hour, the crowd is a fraction of the midday peak, and the morning light — coming from the east — falls directly onto the Tower’s main facade, providing clean, well-lit conditions. The shadows from the Cathedral to the west are also interesting at this angle.
Late afternoon / golden hour (after 17:00–18:00) The second best window. As the sun moves west, it illuminates the lawn and the Tower’s west-facing side in warm golden light. This is arguably the best light of the day for the overall square — the Baptistery and Cathedral benefit particularly. In summer, the Tower is open until 22:30, and the illuminated Tower against a darkening sky is genuinely spectacular.
Midday (11:00 AM – 15:00 PM) Harsh overhead light, maximum crowds. The midday sun casts flat shadows on the Tower and the white marble overexposes easily. This is the most challenging time for photography. If you must be there at midday, overcast days provide more even light and are actually better photographically than bright sunshine at this hour.
Cloudy days Contrary to instinct, soft overcast light is often ideal for the Tower — it provides even illumination without harsh shadows, and the white Carrara marble photographs beautifully in diffused light. Do not discount a cloudy day for photography.
The Classic Forced-Perspective Shot: How It Works
Stand 15–20 metres from the Tower base (east side of the lawn). Have the photographer crouch or kneel 30–40 metres behind you. The camera angle is everything — shoot low and direct your subject in small adjustments until their hands appear to align with the Tower’s top. Use burst mode.
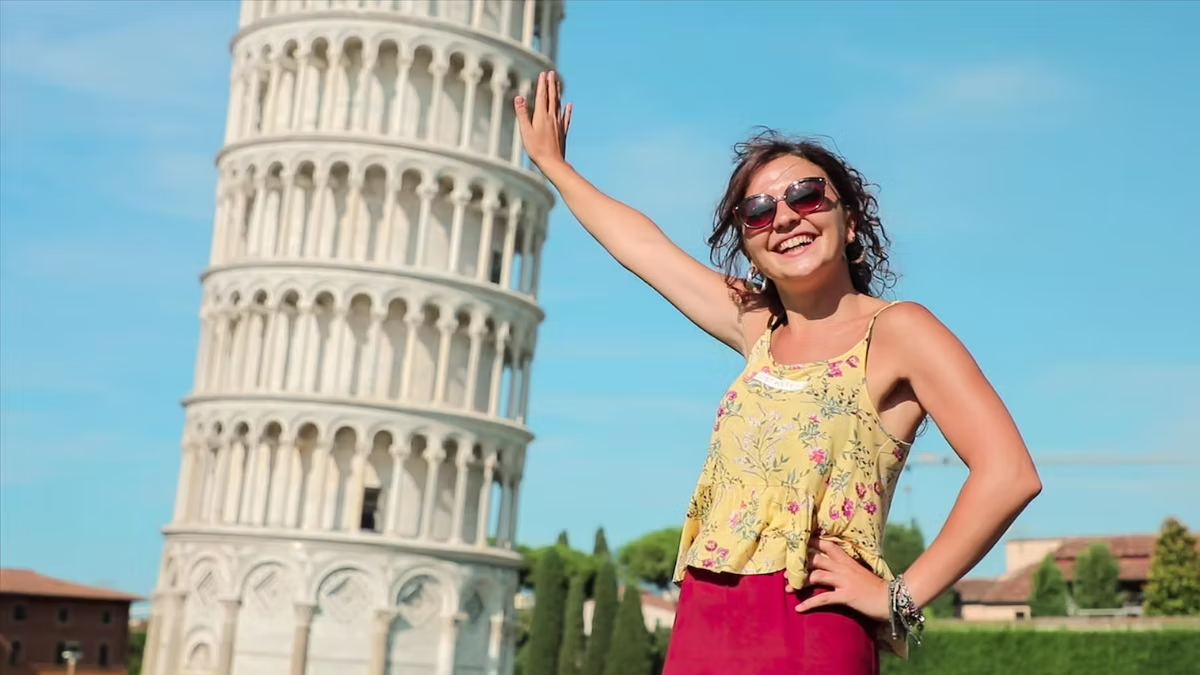
The famous “holding up” or “pushing over” shot exploits forced perspective — the optical illusion created when a photographer positions a subject close to the camera while keeping a distant, large object in the background. Because the camera captures everything in a flat 2D image, a person’s hand can appear to be touching or supporting the Tower from hundreds of metres away.
How to set it up:
- Subject position: Stand 15–20 metres from the Tower base on the east side of the square. The Tower leans away from you here, maximising the lean visible in the photograph.
- Photographer position: Move 30–40 metres further back and crouch low — kneel or squat on the grass. The lower the camera angle, the more dramatic the Tower appears relative to your subject.
- Alignment: The photographer directs the subject in small adjustments until hands or body align with the Tower’s top. This takes several attempts — use burst mode to capture multiple frames.
- Common mistakes to avoid: Standing too close together (collapses the illusion); camera angle too high (reduces Tower’s apparent size); subject facing forward instead of looking up; failing to align hands with the actual top of the Tower.
Popular poses beyond “holding it up”: – Pinching the top — extend thumb and forefinger as if grasping the Tower’s apex – Pushing it over — push palms against the Tower’s tilt side – Leaning against it — mirror the Tower’s own lean with your body – Balancing it on one finger — works particularly well with a telephoto lens from distance – Catching it — run toward the Tower with hands outstretched
The Best Positions Around the Square
East lawn for the classic forced-perspective shot. North-west corner for a wide shot including all three main monuments. Sinopie Museum courtyard for a less-crowded architectural frame. Top gallery of the Tower for the bird’s-eye view over the Cathedral roof.
East side of the lawn (facing the Tower) The classic position. The Tower leans slightly away from you here, which maximises the lean visible in the photograph and is the best spot for the forced-perspective shot. This is where most visitors cluster — early morning is the only reliable way to have space here.
North end near the Baptistery From the north-west corner of the square, you can compose a wider shot including the Cathedral, Baptistery, and Tower together — the full monumental complex in one frame. This view is less crowded than the east-facing position and rewards a wide-angle lens.
Inside the Sinopie Museum courtyard A less-known spot that frames the Tower cleanly through a courtyard gateway with minimal visitors. Worth exploring for a quieter, more architectural shot.
From the top of the Tower Once you climb to the belfry gallery, the view looking straight down at the Cathedral roof and the Baptistery from above is one of the most unusual perspectives in Piazza dei Miracoli. The Cathedral’s striped marble roof from above is rarely photographed and makes for striking images. Photography is permitted inside the Tower and at the top.
The spiral staircase looking up From inside the Tower, looking up the spiral marble staircase creates a mesmerising architectural image — the lean causes the staircase to appear to spiral asymmetrically. Worth attempting even with a smartphone.
City walls for elevation The medieval walls around the square’s perimeter can be accessed for a small fee (separate ticket). From the walkway on top, you get an elevated perspective over the entire square — particularly useful for wider compositional shots including all monuments together.
Camera and Smartphone Tips
Gridlines: Enable gridlines on your smartphone camera (available in most camera settings). At Piazza dei Miracoli, align the Tower along the right vertical third of the frame — this compensates for the lean and creates a more visually balanced composition than centring the Tower.
Tap to focus: On smartphones, tap the Tower itself (not the sky or foreground) to set correct exposure for the marble. If the sky is bright, swipe down slightly after focusing to reduce exposure and preserve the detail in the white stone.
Wide-angle vs telephoto: A wide-angle lens (or the standard smartphone camera) works best for capturing the whole square with context. A telephoto or zoomed lens works better for isolating the Tower or details of the facade, and also helps with some forced-perspective shots by compressing the apparent distance between subject and Tower.
Burst mode: For the forced-perspective shot, use burst mode (hold the shutter button or use action mode) to capture several frames of small adjustments. Pick the best alignment in editing.
Tripods: Tripods are permitted in the outdoor areas of the square. Inside the monuments, they are generally not allowed. A small travel tripod or gorilla pod is useful for self-portraits if visiting solo.
Drones: Recreational drone flight is prohibited over the UNESCO site. Professional operators require a specific permit and advance notice to the local Prefecture. Do not fly a drone here.
Beyond the Classic Shot: Creative Ideas
Architectural details: The exterior of the Tower is covered in extraordinarily fine detail — blind arcading, carved capitals, marble relief panels, and the texture of the Carrara stone itself. Get close and photograph the material and craftsmanship rather than always pulling back for the full view.
The Cathedral facade: Most visitors focus on the Tower and overlook the Cathedral’s extraordinary facade — layered arcades of columns, bronze doors, and marble inlay work. In morning light with the sun behind you, it photographs beautifully.
Candid moments: The lawn at Piazza dei Miracoli is a stage for human theatre — dozens of tourists attempting and debating their forced-perspective shots simultaneously. Candid wide shots of this collective ritual are often more interesting than posed photographs.
Reflections: After rain, the marble pavement around the square creates brief reflections of the Tower and Cathedral. These windows are short-lived but produce beautiful images when they occur.
Evening illumination: In summer, the Tower is lit after dark. The warm lighting against a deep blue sky in the 30–60 minutes after sunset produces some of the most atmospheric photographs possible from this location — with minimal crowds compared to midday.
Frequently Asked Questions
Where exactly should I stand for the classic Pisa photo?
Stand on the east side of the lawn, roughly 15–20 metres from the Tower base. Have the photographer crouch or kneel 30–40 metres behind you. The photographer aims low and directs you with small adjustments until your hands appear to align with the top of the Tower.
What time of day is best for photos at the Leaning Tower?
Early morning (9:00–10:30 AM) for fewest crowds and direct morning light. Late afternoon (after 17:00) for golden-hour warm light. Midday is the worst: harsh overhead light and maximum crowds.
Is photography allowed inside the Tower?
Yes. Photography is permitted throughout the Tower, including the staircase and the top gallery. Camera bags and tripods must be stored at the cloakroom before entry — keep your camera or phone accessible in a pocket.
Can I use a tripod in Piazza dei Miracoli?
Yes, in the outdoor areas of the square. Tripods are generally not permitted inside the monuments.
How do I take a photo of the Tower without crowds in it?
Arrive at or just after opening (9:00 AM) or in the evening (after 19:00 in summer). Compose upward-facing shots to exclude ground-level crowds from the frame. A telephoto lens from a distance also helps isolate the Tower. There is no time of day in peak season when the square is completely empty.
Can I photograph inside the Cathedral?
Yes, photography is permitted inside the Cathedral. Flash photography is not allowed.